Створення вузлу машинного навчання для Node-RED за допомогою TensorFlow.js
By va barbosa, Ton A Ngo, Paul Van Eck, Yi-Hong Wang, Ted Chang Published 27 травня 2020 р.
Ця стаття перекладена та адаптована з ориігнальної статті Build a machine learning node for Node-RED using TensorFlow.js
Зниження бар’єрів для входу на територію штучного інтелекту (ШІ) є метою, до якої постійно прагнуть. Зроблення штучного інтелекту більш доступним не тільки збільшить кількість людей, які фактично використовують штучний інтелект, але й сприятиме поширенню та прийняттю штучного інтелекту в багатьох різних галузях. Світ машинного навчання спочатку може бути страшним, але є кілька підходів, які спрощують увесь процес розробки додатків зі штучним інтелектом. Одним із таких підходів є поєднання використання TensorFlow.js із Node-RED. У цьому посібнику показано, як використовувати цей підхід для створення програм Node-RED із підтримкою штучного інтелекту в різних середовищах.
У той час як Node-RED забезпечує середовище розробки, включення машинного навчання у ваші програми є ще одним ключовим компонентом. TensorFlow.js заповнює цю прогалину. Відповідні екосистеми Node.js роблять інтеграцію двох технологій легкою, де вузол TensorFlow.js Node-RED можна легко створити, упакувати та завантажити в npm для спільного використання.
TensorFlow.js також надає перевагу запуску моделей безпосередньо на пристрої без взаємодії із зовнішнім сервером або хмарою. Це полегшує більшість проблем із безпекою даних або підключенням до Інтернету. Крім того, із зростаючою доступністю вузлів TensorFlow.js Node-RED, наданих спільнотою, можна реалізувати кілька різних програм штучного інтелекту, не написавши жодного рядка коду.
У цьому посібнику ми висвітлюємо:
- Використання загальнодоступних пакетів TensorFlow.js Node-RED
- Створення власних пакетів TensorFlow.js Node-RED
- Увімкнення TensorFlow.js на пристроях IoT
- Розгортання Node-RED у хмарних середовищах
Передумови
Щоб дотримуватися цього посібника, ви повинні мати:
- Базові знання:
- Знайомство з концепціями ШІ та машинного навчання
- Ноутбук або робоча станція з найновішою версією Linux®, MacOS або Windows™ із:
Кроки
Використання наявних вузлів TensorFlow.js Node-RED
Для зручності ми реалізували кілька часто використовуваних функцій як спеціальні вузли Node-RED. Ми коротко пояснюємо їх використання з прикладами потоків, щоб допомогти вам швидко почати роботу з TensorFlow.js Node-RED. Зауважте, що для більшості цих користувацьких вузлів потрібен @tensorflow/tfjs-node як однорангова залежність, тому переконайтеся, що він встановлений у середовищі вузла Node-RED перед встановленням цих користувацьких пакетів вузлів.
Спеціальні вузли
node-red-contrib-tf-functionімітує основну функцію Node-REDFunction, а також включає змінну TensorFlow.js (tf) у глобальний контекст.node-red-contrib-tf-modelзавантажує моделі TensorFlow і виконує висновок. Наразі цей вузол підтримує лише веб-формати моделі JSON, але незабаром буде додано підтримкуSavedModel.node-red-contrib-post-object-detectionpost-object-detectionобробляє вихід моделі Object Detection.bbox-imageпозначає вихідне зображення обмежувальними рамками.
node-red-contrib-bert-tokenizerперетворює текст у функції введення для моделі BERT.
Приклад потоків
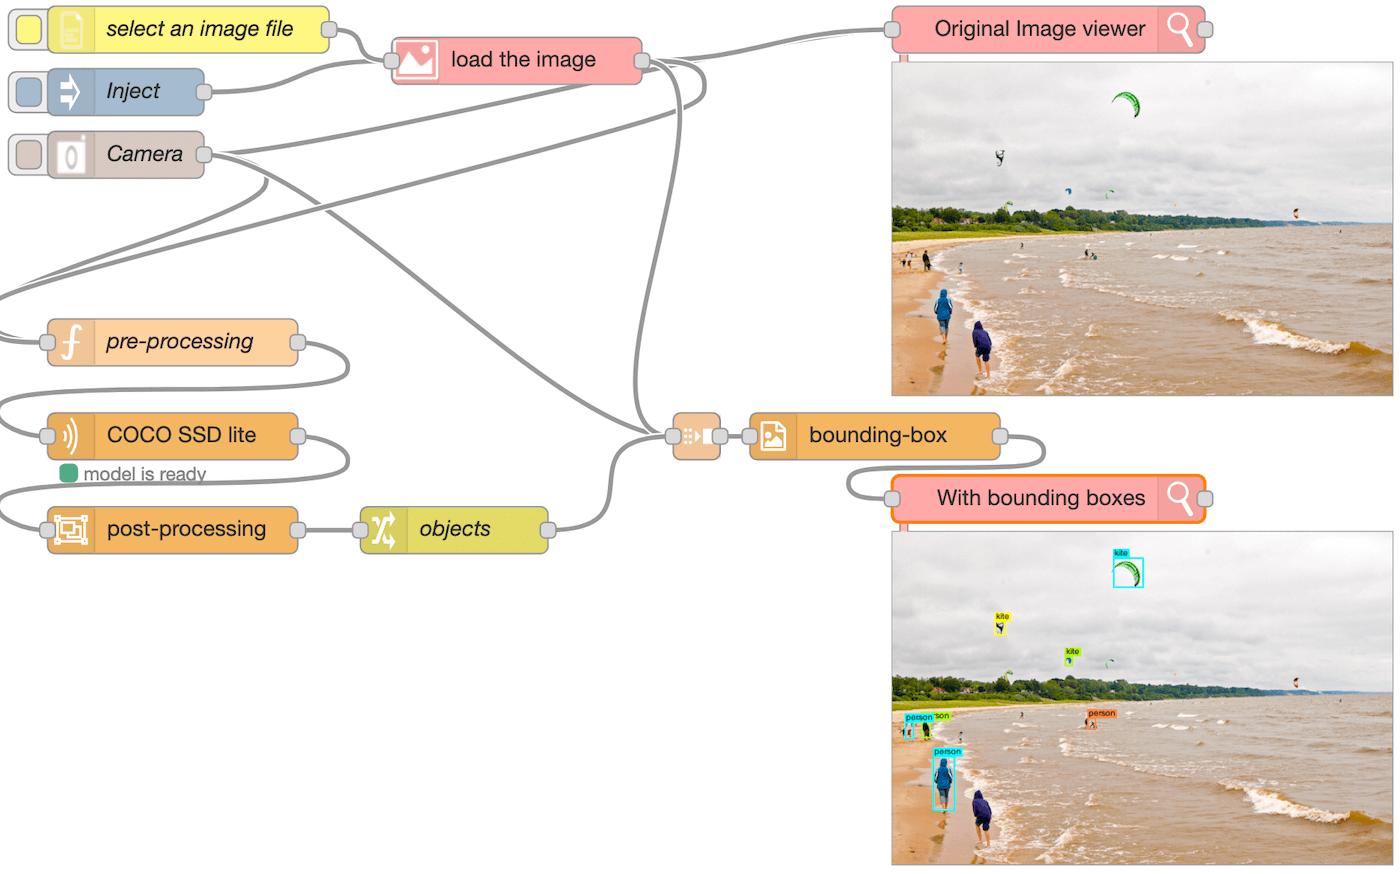
Виявлення об’єктів
Потік Object detection розпізнає об’єкти на зображенні та позначає об’єкти обмежувальними рамками. Зображення можна завантажити з вбудованої камери, файлової системи або шляхом введення зображення за замовчуванням. Переконайтеся, що для всіх цих вхідних вузлів встановлено пакет node-red-contrib-browser-utils. Цей потік використовує три користувацькі вузли, згадані вище (tf-function, tf-model і post-object-detection).
Завантажене зображення передається у вузол pre-processing як msg.payload. Об’єкт msg — це об’єкт JavaScript, який використовується для передачі повідомлень між вузлами. За домовленістю він має властивість payload, що містить вихідні дані попереднього вузла. Вузол функції pre-processing є прикладом tf-function, яка безпосередньо викликає tf.node.decodeImage із попередньо визначеною змінною tf. Вузол створює представлення зображення Tensor4D як корисне навантаження, а потім передає його вузлу COCO SSD lite, який є екземпляром спеціального вузлу tf-model . Це завантажує COCO-SSD lite model.json із зовнішньої URL-адреси та запускає висновок на моделі.
Результат моделі проходить через вузол post-process, який повертає масив об’єктів, що містить властивості bbox, className і score. Вузол objects поєднує додаткову властивість complete, яка має значення true, до msg з об’єктом зображення. Потім вузол bounding-box малює обмежувальні рамки на вхідному зображенні та відображає його у браузері.
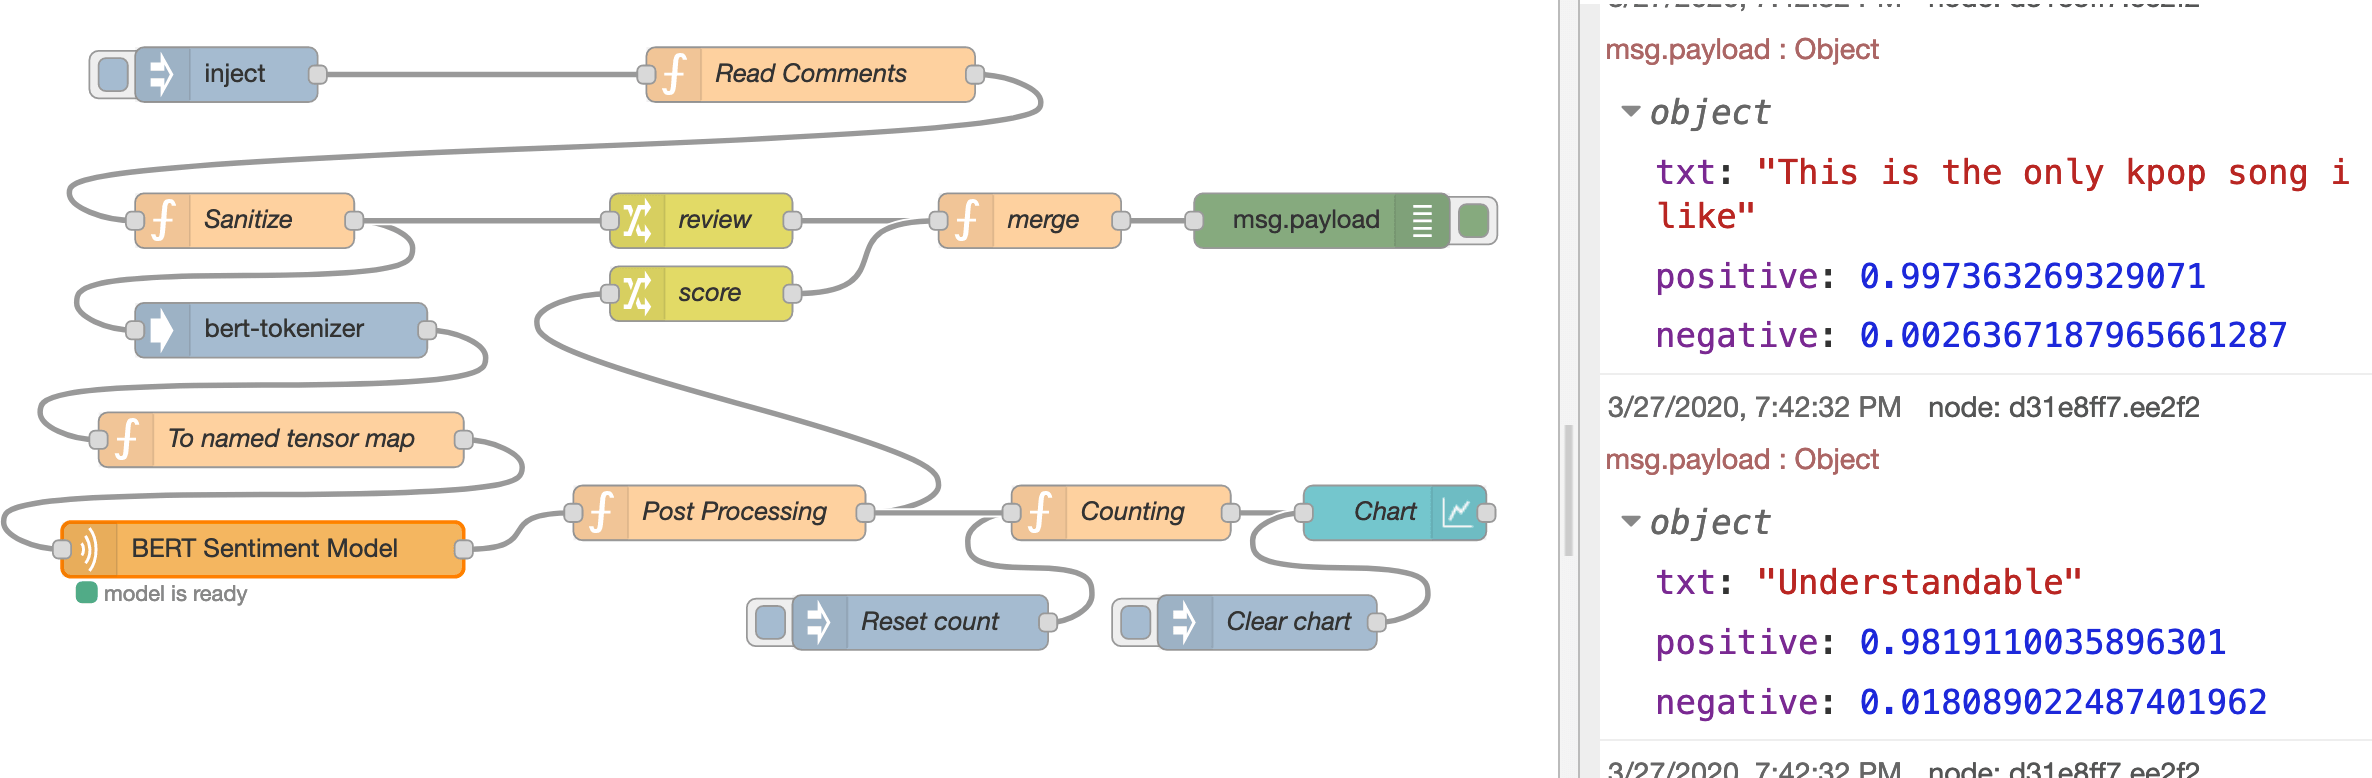
Аналіз настроїв BERT
Приклад потоку Аналіз настрою BERT використовує модель настрою BERT для класифікації коментарів відео YouTube і наносить результати на графік. На додаток до вузлів tf-function і tf-model, ми використовуємо ще один спеціальний вузол, bert-tokenizer, щоб перетворити текст у тензори введення. Для цього потоку необхідні інші пакети: node-red-dashboard і youtube-comments-stream. Зауважте, що завантажену тут модель BERT sentiment model конвертовано з MAX-Text-Sentiment-Classifier SavedModel, який приймає іменовану тензорну карту як вхідні дані, як показано в наступному коді.
{
    input_ids_1 : tensor([1,128], "int32"),
    segment_ids_1 : tensor([1,128], "int32"),
    input_mask_1 : tensor([1,128],"int32")
}
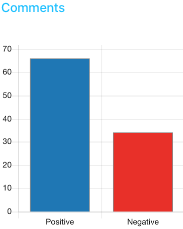
Модель повертає результат softmax, що представляє ймовірність того, що вхідні дані є як позитивними, так і негативними в тензорному масиві. Потім потік підраховує кількість позитивних і негативних коментарів і виводить кількість у вузол гістограми. Цей вузол гістограми належить до пакета node-red-dashboard, який дозволяє користувачам створювати інформаційні панелі даних і віджети в реальному часі. Доступ до інформаційної панелі можна отримати з кінцевої точки /ui/ (наприклад, http://localhost:1880/ui/).
Note: For the Read Comments function node to work, ensure you have the following code in your Node-RED settings.js file.
functionGlobalContext: {
  commentsStream:require('youtube-comments-stream')
},
Створення спеціального вузла TensorFlow.js Node-RED
У попередньому розділі цього посібника ви запустили попередньо упаковані вузли TensorFlow.js Node-RED. Ці вузли дозволяють швидко розпочати роботу, щоб виконувати багато завдань машинного навчання, маючи лише базові знання про модель, TensorFlow.js і Node-RED.
Незважаючи на те, що ці вузли корисні, вони стосуються лише деяких випадків використання. Якщо ваш варіант використання не охоплений існуючими вузлами, ви можете створити власний спеціальний вузол. Повна документація щодо створення спеціального вузла Node-RED надається в іншому місці і тут не повторюється, але в наступних кроках показано достатньо деталей, щоб підкреслити, як інтегрувати API TensorFlow.js. Ваш вузол імпортує бібліотеку TensorFlow.js для Node.js, завантажує веб-модель TensorFlow.js і виконує висновок на моделі.
Для узгодженості ми використовуємо та розширюємо модель COCO-SSD, про яку ви дізналися в першому посібнику An introduction to AI in Node.js у цій серії. Ми створимо спеціальний вузол Node-RED для виявлення об’єктів за допомогою моделі COCO-SSD TensorFlow.js.
Компоненти вузла Node-RED
Вузол Node-RED — це пакет модуля/npm Node.js, який складається з трьох основних файлів.
-
файл JavaScript, який означує поведінку вузла
- HTML-файл, що містить властивості вузла, діалогове вікно редагування та текст довідки
- Файл
package.json, який описує метадані модуля Node.js
Файл JavaScript – це те місце, куди ви обернете свій код TensorFlow.js. Він завантажить модель TensorFlow.js і запустить прогноз. Після того, як усі файли об’єднано та встановлено, настроюваний вузол відображається в редакторі, готовий до підключення до потоку та розгортання.
Ініціалізуйте настроюваний модуль вузла
По-перше, ви повинні налаштувати середовище розробки Node-RED. Ви розробляєте спеціальний вузол і запускаєте Node-RED із цього середовища, щоб уникнути можливого конфлікту з іншими спеціальними вузлами, а також необхідності інсталювати спеціальний вузол у вашому глобальному середовищі Node-RED під час розробки.
From a terminal window:
1) Створіть новий каталог проекту Node-RED і перейдіть у цей новий каталог.
 mkdir nodered-dev
 cd nodered-dev
Ініціалізуйте пакет npm для проекту та дайте відповіді на запитання (наприклад, package name nodered-dev).
npm init
Установіть залежності node-red і @tensorflow/tfjs-node.
npm install node-red @tensorflow/tfjs-node
Відредагуйте щойно створений файл package.json за допомогою VS Code або вашої улюбленої IDE.
Додайте сценарій start, який використовується для запуску Node-RED.
 {
   "name": "nodered-dev",
   ...
   "scripts": {
     "start": "node-red"
   }
   ...
 }
Коли папка проекту Node-RED буде готова, ви можете розпочати власний вузол.
2) Створіть каталог у новому каталозі проекту Node-RED для спеціального вузла та перейдіть у цей каталог.
 mkdir node-red-contrib-tfjs-tutorial
 cd node-red-contrib-tfjs-tutorial
Примітка: якщо ви вирішите використовувати node-red у назві свого вузла, рекомендується додати до нього префікс
node-red-contrib-, щоб відрізнити його від вузлів, які підтримує Node-RED проект .
Ініціалізуйте пакет npm для спеціального вузла та дайте відповіді на запитання (наприклад, package name node-red-contrib-tfjs-tutorial).
npm init
Відредагуйте щойно створений файл package.json за допомогою VS Code або вашої улюбленої IDE.
Додайте розділ node-red, який повідомляє середовищу виконання файли вузлів, що містяться в модулі, а також додайте розділ peerDependecies для модуля @tensorflow/tfjs-node.
 {
   "name": "node-red-contrib-tfjs-tutorial",
   ...
   "peerDependencies": {
     "@tensorflow/tfjs-node": "^1.7.2"
   },
   "node-red": {
     "nodes": {
       "tfjs-tutorial-node": "index.js"
     }
   }
 }
Файл package.json — це стандартний файл пакета модуля Node.js, єдина відмінність — доданий розділ node-red. Після ініціалізації та налаштування файлу package.json наступним кроком є означення поведінки вузла.
Опишіть зовнішній вигляд спеціального вузла
Зовнішній вигляд вузла визначається у файлі HTML за допомогою трьох тегів script. Файл реєструє вузол у редакторі Node-RED і містить шаблон для діалогового вікна редагування вузла та текст довідки.
У каталозі вашого вузла:
-
Створіть новий файл HTML (тобто
index.html) і відкрийте його в середовищі IDE. -
Додайте код для визначення шаблону для діалогового вікна редагування вузла. Класи значків із Font Awesome 4.7 (наприклад,
fa-tag) доступні для використання в шаблоні.<div class="form-row">слід використовувати для розмітки кожного рядка діалогового вікна. Кожна властивість, яка передається вузлу, повинна мати ідентифікатор у форматіnode-input-<propertyname>.
 <script type="text/html" data-template-name="tfjs-tutorial-node">
   <div class="form-row">
     <label for="node-input-name"><i class="fa fa-tag"></i> Name</label>
     <input type="text" id="node-input-name" placeholder="Name">
   </div>
   <div class="form-row">
     <label for="node-input-name"><i class="fa fa-globe"></i> Model Url</label>
     <input type="text" id="node-input-modelUrl" placeholder="https://modelurl/model.json">
   </div>
   <div class="form-row">
     <label for="node-input-name">Is a TFHub model url?</label>
     <input type="checkbox" id="node-input-fromHub" checked>
   </div>
 </script>
Додайте код для реєстрації вузла в редакторі. category означує, до якої групи помістити вузол у вікні палітри редактора. Входи і виходи описують, скільки входів і виходів містить вузол. defaults встановлює значення за замовчуванням для параметрів, які використовуються вузлом і визначені в шаблоні.
 <script type="text/javascript">
   RED.nodes.registerType('tfjs-tutorial-node', {
     category: 'machine learning',
     defaults: {
       name: { value: 'tfjs tutorial node' },
       modelUrl: { value: 'https://tfhub.dev/tensorflow/tfjs-model/ssdlite_mobilenet_v2/1/default/1' },
       fromHub: { value: 'checked' }
     },
     inputs: 1,
     outputs: 1,
     paletteLabel: 'tfjs tutorial node',
     color: '#ff9100',
     label: function() {
       return this.name || 'tfjs tutorial node';
     }
   });
 </script>
Додайте текст довідки для вузла. Це з’являється, коли користувач переглядає інформаційну панель вузла.
 <script type="text/html" data-help-name="tfjs-tutorial-node">
   <p>A TensorFlow.js node to run prediction using the Coco SSD model for object detection.</p>
   <p>Provide a <strong>Model URL</strong> and indicate whether the URL points to a TFHub hosted model.</p>
   <p>The node accepts an image buffer and outputs a JSON prediction object with detected objects and their bounding box and confidence score.</p>
 </script>
Означте власну поведінку вузла
Далі означте поведінку вузла (у функції, яку потрібно зареєструвати в середовищі виконання). Функція викликається кожного разу, коли створюється новий екземпляр вузла, і йому передаються властивості, встановлені в редакторі потоку та діалоговому вікні редагування. Функція має викликати RED.nodes.createNode, щоб ініціалізувати функції, спільні для всіх вузлів.
Ця функція вузла загорнута в модуль Node.js. Модуль експортує функцію, яка викликається, коли середовище виконання завантажує вузол під час запуску. Експортованій функції передається один аргумент, який забезпечує доступ модуля до API середовища виконання Node-RED.
У каталозі вашого вузла:
-
Відкрийте файл
index.jsу вашому IDE. -
Додайте наступний код у щойно створений файл JavaScript, щоб створити функцію вузла, зареєструвати функцію вузла та експортувати вузол.
 // export the node module
 module.exports = function(RED) {
   // define the node's behavior
   function TfjsTutorialNode(config) {
     // initialize the features
     RED.nodes.createNode(this, config);

     // register a listener to get called whenever a message arrives at the node
     node.on('input', function (msg) {
       // handle incoming message
     });
   }

   // register the node with the runtime
   RED.nodes.registerType('tfjs-tutorial-node', TfjsTutorialNode);
 }
Створіть новий файл JavaScript (тобто tfjs-tutorial-util.js) і відкрийте його в середовищі IDE. Цей файл використовує більшу частину коду, написаного в попередньому посібнику (для завантаження моделі, попередньої обробки вхідних даних і обробки вихідних даних). Щоб дізнатися більше про код, відвідайте перший навчальний посібник у цій серії.
Додайте код до цього нового файлу, щоб завантажити бібліотеку tfjs-node і попередньо обробити вхідні дані. Код також посилається на файл labels.js. Цей файл містить зіставлення міток об’єктів із значенням індексу/ідентифікатором, які повертає модель. Ви можете знайти файл labels.js тут.
 const tf = require('@tensorflow/tfjs-node');
 const labels = require('./labels.js');

 // load COCO-SSD graph model from TensorFlow Hub
 const loadModel = async function (modelUrl, fromTFHub) {
   console.log(`loading model from ${modelUrl}`);

   if (fromTFHub) {
     model = await tf.loadGraphModel(modelUrl, {fromTFHub: true});
   } else {
     model = await tf.loadGraphModel(modelUrl);
   }

   return model;
 }

 // convert image to Tensor
 const processInput = function (imageBuffer) {
   console.log(`preprocessing image`);

   const uint8array = new Uint8Array(imageBuffer);

   return tf.node.decodeImage(uint8array, 3).expandDims();
 }
Продовжуйте редагувати файл, щоб додати код для обробки вихідних даних передбачення моделі та експортувати функції.
 const maxNumBoxes = 5;

 // process the model output into a friendly JSON format
 const processOutput = function (prediction, height, width) {
   console.log('processOutput');

   const [maxScores, classes] = extractClassesAndMaxScores(prediction[0]);
   const indexes = calculateNMS(prediction[1], maxScores);

   return createJSONresponse(prediction[1].dataSync(), maxScores, indexes, classes, height, width);
 }

 // determine the classes and max scores from the prediction
 const extractClassesAndMaxScores = function (predictionScores) {
   console.log('calculating classes & max scores');

   const scores = predictionScores.dataSync();
   const numBoxesFound = predictionScores.shape[1];
   const numClassesFound = predictionScores.shape[2];

   const maxScores = [];
   const classes = [];

   // for each bounding box returned
   for (let i = 0; i < numBoxesFound; i++) {
     let maxScore = -1;
     let classIndex = -1;

     // find the class with the highest score
     for (let j = 0; j < numClassesFound; j++) {
       if (scores[i * numClassesFound + j] > maxScore) {
         maxScore = scores[i * numClassesFound + j];
         classIndex = j;
       }
     }

     maxScores[i] = maxScore;
     classes[i] = classIndex;
   }

   return [maxScores, classes];
 }

 // perform non maximum suppression of bounding boxes
 const calculateNMS = function (outputBoxes, maxScores) {
   console.log('calculating box indexes');

   const boxes = tf.tensor2d(outputBoxes.dataSync(), [outputBoxes.shape[1], outputBoxes.shape[3]]);
   const indexTensor = tf.image.nonMaxSuppression(boxes, maxScores, maxNumBoxes, 0.5, 0.5);

   return indexTensor.dataSync();
 }

 // create JSON object with bounding boxes and label
 const createJSONresponse = function (boxes, scores, indexes, classes, height, width) {
   console.log('create JSON output');

   const count = indexes.length;
   const objects = [];

   for (let i = 0; i < count; i++) {
     const bbox = [];

     for (let j = 0; j < 4; j++) {
       bbox[j] = boxes[indexes[i] * 4 + j];
     }

     const minY = bbox[0] * height;
     const minX = bbox[1] * width;
     const maxY = bbox[2] * height;
     const maxX = bbox[3] * width;

     objects.push({
       bbox: [minX, minY, maxX, maxY],
       label: labels[classes[indexes[i]]],
       score: scores[indexes[i]]
     });
   }

   return objects;
 }

 module.exports = {
   loadModel: loadModel,
   processInput: processInput,
   processOutput: processOutput
 }
Оновіть файл index.js та імпортуйте файл tfjs-tutorial-util.js, завантажте модель і запустіть передбачення, коли отримано вхідне повідомлення.
 // export the node module
 module.exports = function(RED) {
   // import helper module
   const tfmodel = require('tfjs-tutorial-util.js');

   // load the model
   async function loadModel (config, node) {
     node.model = await tfmodel.loadModel(config.modelUrl, config.fromHub);
   }

   // define the node's behavior
   function TfjsTutorialNode(config) {
     // initialize the features
     RED.nodes.createNode(this, config);
     const node = this

     loadModel(config, node)

     // register a listener to get called whenever a message arrives at the node
     node.on('input', function (msg) {
       // preprocess the incoming image
       const inputTensor = processInput(msg.payload);
       // get image/input shape
       const height = inputTensor.shape[1];
       const width = inputTensor.shape[2];

       // get the prediction
       node.model
         .executeAsync(inputTensor)
         .then(prediction => {
           msg.payload = tfmodel.processOutput(prediction, height, width);
           // send the prediction out
           node.send(msg);
         });
     });
   }

   // register the node with the runtime
   RED.nodes.registerType('tfjs-tutorial-node', TfjsTutorialNode);
 }
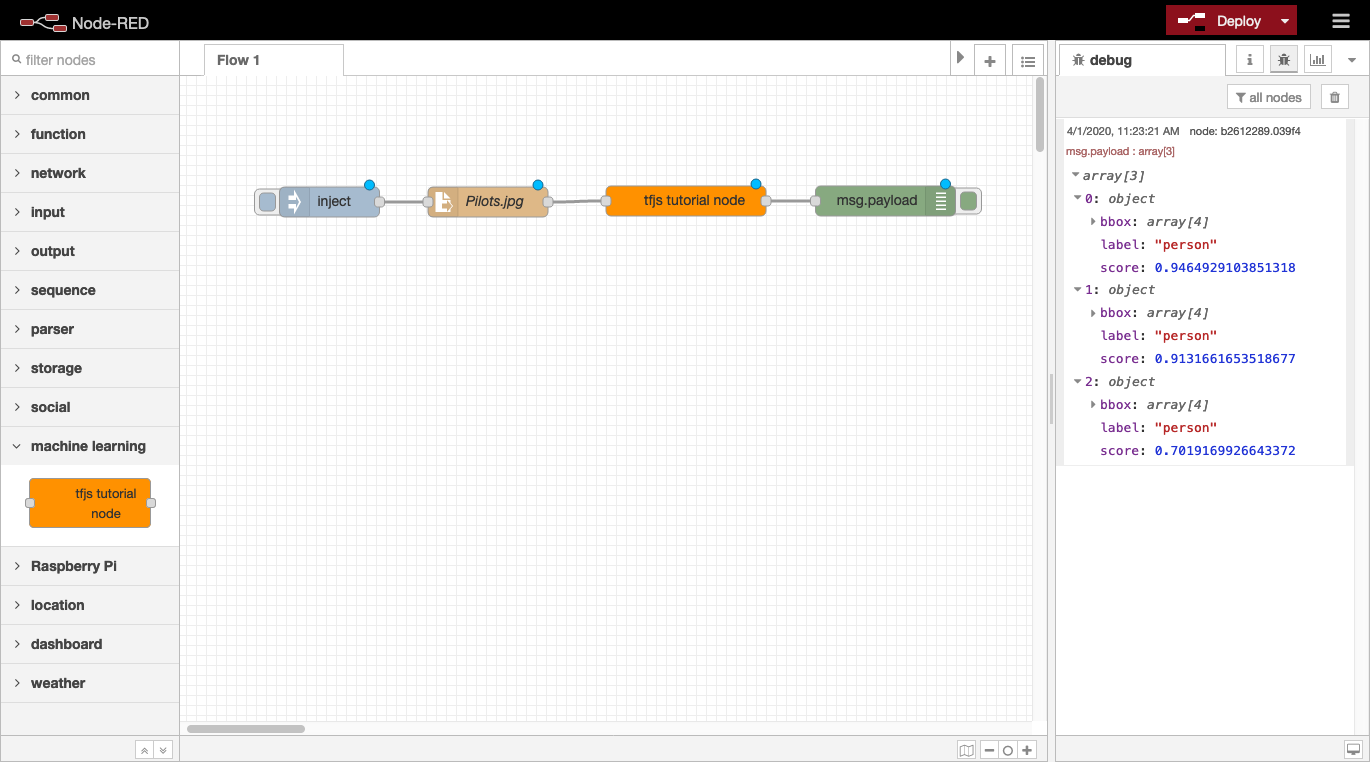
Test your custom node
With your custom node’s behavior and appearance defined, the node is ready to be installed, added to a flow, and tested. You can test your node while developing it by linking it to your local Node-RED environment. This lets you continue development of your node and have changes picked up just by restarting Node-RED.
From a terminal window:
-
Go to your Node-RED project directory (that is,
nodered-dev). -
Install your custom
node-red-contrib-tfjs-tutorialnode.npm install node-red-contrib-tfjs-tutorial
Launch Node-RED.
npm start
-
In the Palette window, you should find your custom node (that is,
tfjs tutorial node) that you can use to create a flow that passes an image buffer to the custom node. For example, you can connect aFile innode configured to a local image file (and output set to a Buffer object). -
Deploy and run the flow to see the output from the custom node.
Note: If you have an existing Node-RED environment and want to install the local Node-RED custom node into that environment, then use the yalc package. Yalc is the recommended way of working with local packages without publishing anything to a remote registry.
# Install.
npm i -g yalc

# In the custom node directory (i.e. node-red-contrib-tfjs-tutorial/), run the following.
yalc publish

# In Node-RED environment directory, add the custom node as a dependency.
yalc add node-red-contrib-tfjs-tutorial
You can find the complete custom node (tfjs tutorial node) in this repository. Learn more about creating custom Node-RED nodes in the Node-RED documentation.
Запустіть Node-RED з TensorFlow.js на пристроях IoT
Зараз багато edge пристроїв мають достатню апаратну обчислювальну потужність для запуску Node-RED, а деякі пристрої оснащені потужними графічними процесорами (GPU) і підходять для додатків машинного навчання. Версія Node.js TensorFlow.js дозволяє інтегрувати власну спільну бібліотеку TensorFlow і використовувати всю потужність кількох пристроїв.
Залежно від специфікації обладнання вашого пристрою доступні два варіанти: прискорення CPU або GPU . Обидва варіанти покладаються на той самий фундаментальний компонент, спільні бібліотеки TensorFlow. Однак на периферійних пристроях наразі є деякі застереження щодо TensorFlow.js, які ми обговоримо нижче.
Отримання спільної бібліотеки TensorFlow
Коли ви встановлюєте пакет @tensorflow/tfjs-node, він встановлює відповідну спільну бібліотеку TensorFlow на основі архітектури CPU на вашому пристрої. Наразі TensorFlow.js підтримує такі основні конфігурації серверів: Ubuntu на x86_64, MacOS X на x86_64 та Win 7 або вище на x86_64. Щоб дізнатися більше про підтримувані платформи, перегляньте цей документ. Якщо ви спробуєте встановити пакет npm на непідтримуваній платформі, ви отримаєте таке повідомлення про помилку.
UnhandledPromiseRejectionWarning: Error: Unsupported system: cpu-linux-arm64
У цьому випадку пакет npm не було встановлено повністю. Бібліотеки JavaScript встановлено, але рідні спільні бібліотеки та прив’язка Node.js відсутні. У наступних розділах ми надаємо інструкції, щоб увімкнути власну підтримку спільної бібліотеки TensorFlow для цих архітектур:
- ARM32 - armv71
- ARM64 з графічним процесором Nvidia - aarch64
CPU approach - on Raspberry Pi
32-розрядна архітектура ARM зазвичай використовується в периферійних пристроях, а найпопулярнішим пристроєм є Raspberry Pi. Хоча Raspberry Pi 4 використовує 64-розрядний Cortex-A72 (ARM v8), ОС Raspbian Buster є 32-розрядним. @tensorflow/tfjs-node до версії 1.4.0 підтримував 32-розрядну версію ARM. Однак цю підтримку не було продовжено після версії 1.4.0. Щоб вирішити цю проблему з версіями після v1.4.0, ви можете встановити підтримувану спільнотою 32-розрядну двійкову збірку спільної бібліотеки TensorFlow.
-
Install the prerequisites.
sudo apt update && sudo apt install python2 build-essential
You need tools and compilers from these packages to build the Node.js binding.
Locate the @tensorflow/tfjs-node package. Usually, it’s under node_modules/@tensorflow/tfjs-node with the directory where you run the npm install command. In this case, it’s where you create the Node-RED project.
Switch to @tensorflow/tfjs-node package’s directory.
cd node_modules/@tensorflow/tfjs-node
You must provide a file named custom-binary.json under the scripts directory with the following contents.
{
  "tf-lib": "https://s3.us.cloud-object-storage.appdomain.cloud/tfjs-cos/libtensorflow-cpu-linux-arm-1.15.0.tar.gz"
}
The URL in the previous code points to the precompiled TensorFlow shared libraries, which are v1.15.0 and for ARM 32-bit architecture.
Run the following command to fetch the prebuilt shared libraries and build the Node.js binding.
npm install
Now, the @tensorflow/tfjs-node package is using native TensorFlow shared libraries.
Note: At the time of writing this tutorial, the latest version of @tensorflow/tfjs-node is v1.7.1 and still depends on TensorFlow v1.15.0. You can check the LIBTENSORFLOW_VERSION variable in the scripts/deps-constants.js file to see which TensorFlow version is needed. @tensorflow/tfjs-node packages from v1.4.0 to v1.7.1 depend on TensorFlow v1.15.0.
GPU approach - on Jetson Nano
The Jetson Nano is a small, powerful computer for embedded applications and AI IoT. Provided by NVIDIA, it is designed to run multiple neural networks in parallel using a Quad-core ARM A57 CPU and 128-core Maxwell GPU. By using the NVIDIA JetPack SDK, you can boot the device into Ubuntu 18.04 with the proper GPU driver, CUDA, and cuDNN libraries. To fully utilize its GPU for model computation, you can use the following instructions, which link the TensorFlow.js to the native TensorFlow shared libraries.
-
Locate the
@tensorflow/tfjs-nodepackage. Usually, it’s undernode_modules/@tensorflow/tfjs-nodewithin the directory where you run thenpm installcommand. In this case, it’s where you create the Node-RED project. -
Switch to the
@tensorflow/tfjs-nodepackage’s directory.cd node_modules/@tensorflow/tfjs-node
You must provide a file named custom-binary.json under the scripts directory with the following content.
{
  "tf-lib": "https://s3.us.cloud-object-storage.appdomain.cloud/tfjs-cos/libtensorflow-gpu-linux-arm64-1.15.0.tar.gz"
}
The URL in the previous code points to the precompiled TensorFlow shared libraries, which are v1.15.0, ARM 64-bit, and linked to CUDA libraries.
Run the following command to fetch the prebuilt shared libraries and build the Node.js binding.
npm install
You can find the Node.js binding, tfjs_binding.node, under the lib directory.
find lib -name tfjs_binding.node
Now, the @tensorflow/tfjs-node is using the Node.js binding to run model computation on the CPU and GPU.
Outline for building TensorFlow shared libraries
If your devices are not supported by TensorFlow.js and you can’t find any precompiled TensorFlow shared libraries provided in the open source community, you have only one option: build the shared library yourself. The following instructions are the general outline for doing this.
-
Determine which TensorFlow version is needed by the TensorFlow.js version you use. You need to check the
scripts/deps-constants.jsfile inside the@tensorflow/tfjs-nodenpm package. In that file, you would see the following lines of code./** Version of the libtensorflow shared library to depend on. */ const LIBTENSORFLOW_VERSION = '1.15.0';
Here, this means you need TensorFlow v1.15.0.
Build the TensorFlow shared library from source.
Before building shared libraries, you must install the build tool, Bazel. You can check the documentation to install Bazel. However, you might not find a prebuilt package for your architecture and platform. If this is the case, then you must build the Bazel from source, or bootstrap bazel.
TensorFlow provides a detailed document to build the TensorFlow pip package from source. The procedures for building shared library packages are the same except for one difference, change the build target to //tensorflow/tools/lib_package:libtensorflow. After getting the source code from the GitHub repository, be sure to check out the tag with the specific version that is needed by your version of TensorFlow.js.
After you finish the build, it produces a bazel-bin/tensorflow/tools/lib_package/libtensorflow.tar.gz file that needs to be manually unpacked to the deps directory of the @tensorflow/tfjs-node package.
tar xf bazel-bin/tensorflow/tools/lib_package/libtensorflow.tar.gz -C <path-to-my-project>/node_modules/@tensorflow/tfjs-node/deps
Build the Node.js binding to link to the shared libraries. Change to the directory of the @tensorflow/tfjs-node package, and run the following command to build the Node.js binding.
cd path-to-my-project/node_modules/@tensorflow/tfjs-node
npm run build-addon-from-source
You can find the Node.js binding, tfjs_binding.node, under the lib directory.
find lib -name tfjs_binding.node
Step 2 is usually the most challenging and time consuming. For example, building Bazel and the TensorFlow shared library would take approximately 24 hours on the Jetson Nano. You might need to tweak some toolchain settings to successfully build the shared library package.
TensorFlow.js with native TensorFlow integration gives you increased performance with the added hardware acceleration, but it can take quite a bit of work to enable. You should attempt to find prebuilt binaries, and save building it from scratch as a last resort.
Example AI-IoT flow
The example flows mentioned earlier can also be run on IoT devices. However, many devices like the Raspberry Pi can allow for additional functions by using sensors. An example flow can be found here.
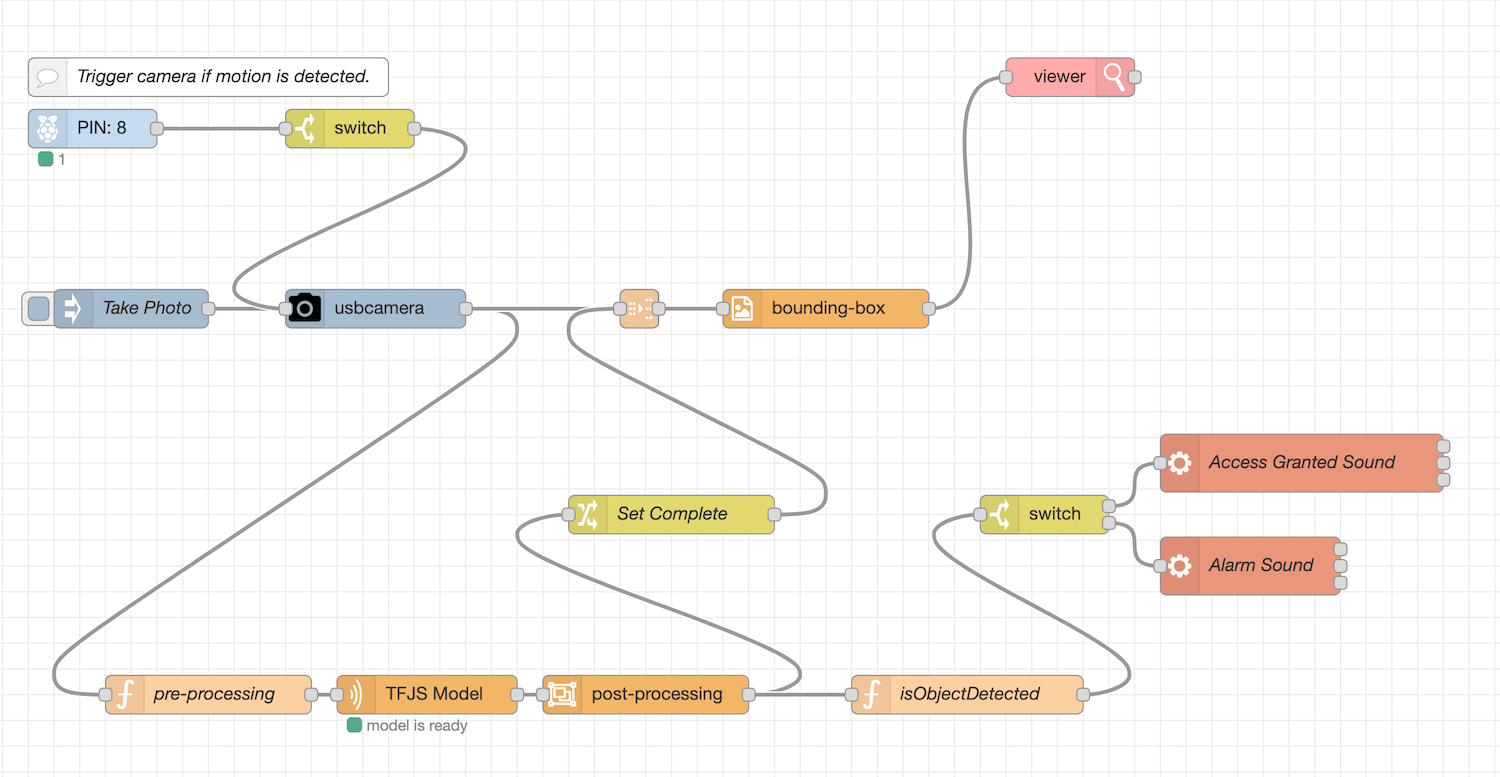
This flow is similar to the object detection flow that used the TensorFlow.js custom nodes above. However, some additional nodes to support attached peripherals and sensors were also added into the flow. This flow expects that the Raspberry Pi has a USB camera, a 3.5 mm jack speaker, and a GPIO motion sensor (for example, HC-SR501 PIR Motion Sensor) attached.
Here, if the sensor detects motion, the output will be 1, and this will trigger the usbcamera node to take a snapshot and send the image to the tf-function, tf-model, and post-object-detection nodes for object detection. A function node uses JavaScript to check whether any of the detected classes is a class of interest. If so, a specific audio clip is played through the connected speaker. Learn more about running this type of flow through the Developing a Machine Learning IoT App with Node-RED and TensorFlow.js code pattern.
Deploy Node-RED with TensorFlow.js in the cloud
Ви навчилися використовувати апаратні можливості пристроїв IoT для TensorFlow.js із Node-RED. Далі ви розглянете, як розгорнути ці потоки Node-RED у хмарі через контейнер. Це особливо корисно в корпоративному середовищі, де потік працює як частина більшої системи мікросервісів. Хмарне розгортання дає змогу використовувати всі доступні можливості хмарної автоматизації, такі як масштабування, висока доступність і поточне оновлення. Хоча хмарне розгортання потоку Node-RED не залежить від глибокого навчання, можливість вбудовувати глибоке навчання може створити багато нових хмарних програм.
Оскільки потік є самодостатнім, контейнеризація потоку є здебільшого вправою з упаковки, щоб відповідати вимогам конкретного хмарного середовища. У наступних розділах описано кілька методів створення образів контейнерів і їх запуску в різних середовищах.
Deploy a Node-RED container
You can directly deploy a Node-RED Docker image from Docker Hub. This runs a Node-RED session with the editor enabled so that you can start creating and running a flow. Note that running on a cloud would require attaching a persistent storage volume so that the flow can persist if the container restarts. If you are running the container on Docker locally on your workstation, simply mount a local directory to the container to save the flow. To create your own custom image, refer to the GitHub repository for more details.
Build a custom image containing a flow
This tutorial gives detailed instructions for packaging your flow in a container image for deployment. The Dockerfile provided there creates a lightweight image that excludes the toolchain for building the image. After your image is ready, you can deploy it on any container orchestration system such as Kubernetes.
Deploy a flow on OpenShift
OpenShift is built on top of Kubernetes and provides additional functions for managing your containers. The OpenShift catalog does include support for Node.js, which allows easy deployment of your Node-RED flow, as described below.
When you select Node.js in the catalog, the dialog window asks for a Git repository URL that should contain the typical Node.js artifacts (choosing Advanced Options allows for more selection). When you deploy the app, OpenShift builds a new image that contains the source from your Git repository in the directory /opt/app-root/src/. Then, it launches the image in a new pod and invokes npm run start in the pod.
Therefore, to package the Git repository per OpenShift’s expectation, you need to gather together four files.
-
flow.json: This is created by Node-RED to save the graph describing your flow. It is saved when you deploy the flow in the editor. The file is usually named after the host name of the system, and its location is indicated in theuserDirattribute, typically,~/.node-red. -
flow_cred.json: This is created by Node-RED to separately save the encrypted credentials from your flow. It is saved when you deploy the flow in the editor. The file location is indicated in theuserDirattribute, typically,~/.node-red. -
settings.js: This contains the various options for the node-RED runtime. You can copy the default file created by Node-RED in the~/.node-red/settings.jsfile. Edit this file to change the default settings (uncomment the attributes as needed). For deployment in a container, you should consider modifying the following attributes:- userDir: Set to the working directory in the pod. You might want to set to
/opt/app-root/src/, where your Git sources will reside in the OpenShift container. - credentialSecret: Set to any string to encrypt or decrypt your credential in the
flow_cred.jsonfile. Make sure the same encryption string is used in the container as when you edit the flow in the Node-RED editor. Otherwise, the container will fail to decrypt the credentials. - httpRoot: Set to false to run in headless mode. That is, the editor is disabled so that the flow cannot be modified.
- userDir: Set to the working directory in the pod. You might want to set to
-
package.json: Create this file and specify the dependencies, which include the Node-RED package along with any packages for the deep learning models and preprocessing. For thestarttarget inscripts, specify the following command to start Node-RED using your customizedsettings.jsfile:node-red --settings settings.js flow.json
See an example here.
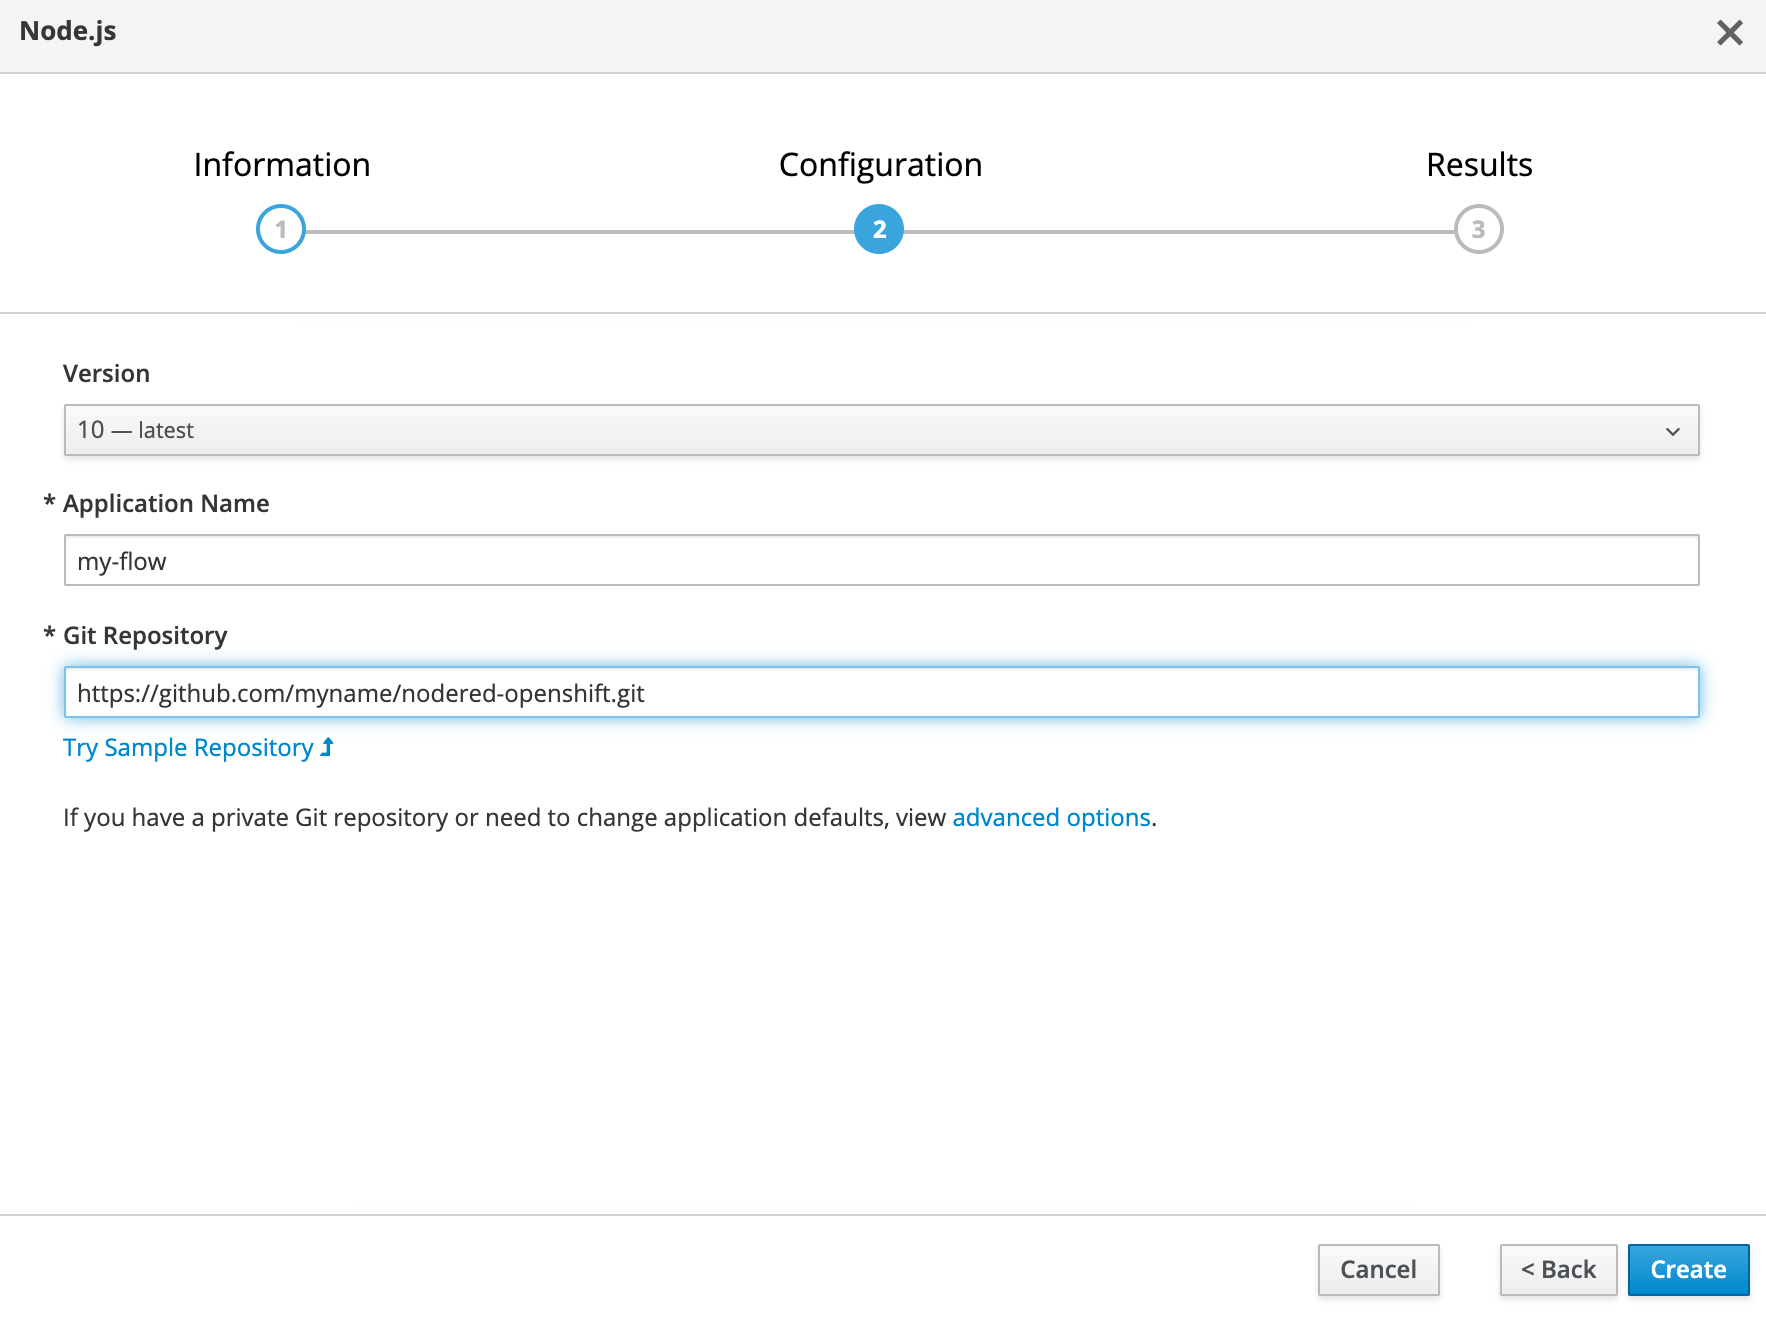
To deploy using the OpenShift web console, click Catalog, and then click Node.js.
In the dialog box for Git Repository, enter the URL for your Git repository, and then click Create.
OpenShift builds a custom image containing the Git source, then creates the pod to run the Node-RED flow along with the service and route to access the pod. If Node-RED is configured to run in headless mode, the service and route can be ignored. You can scale the number of container instances by clicking the up/down icon. If you need to make a change to the flow, you can automate the update to the container by setting a webhook between the OpenShift app and the Git repository. When a new pull request is merged in the Git repository, OpenShift receives a notification, rebuilds the image, and relaunches the pods.
Because a cloud deployment automates many operations, you can improve the performance by giving consideration to how the models are loaded in the flow. Nodes in the flow that embed a model download the model files each time the pod is launched. This includes the first time the flow is deployed, when the pod crashes and is redeployed automatically, and when the pods are scaled-up manually or by autoscaling. Many models are small (approximately 50 MB), but some models can be very large (the large BERT model is approximately 450 MB), so repeated downloading can impact performance. In this case, it can be advantageous to embed the model in the container image. You can build a custom container image and copy the model into the image by following the instructions in this tutorial. The reference to the model in the Node-RED node can then point to the local copy in the model.
The Node-RED package tf-model provides additional flexibility in caching a model and checking if a new version is available. When used in the local workstation, tf-model typically keeps the cache in the ~/.node-red/tf-model directory. The cache directory uses the hash of the model URL as the directory name.
ls -l tf-model
total 8
drwxr-xr-x  108 user  staff  3456 Mar 24 10:24 684586768
-rw-r--r--    1 user  staff   246 Mar 23 16:49 models.json
You can replicate the cache directory in the container image and use the normal URL for the model. When tf-model starts, it checks the local cache and the model URL. If a new version is available, tf-model downloads the new version. Otherwise, it automatically loads from the cache and avoids re-downloading the model.
Summary
The first two tutorials in this series showed how to develop deep learning models in JavaScript and how to easily embed them in your code. In this tutorial, we took it a step further and looked at Node-RED and how it can be used as a graphical tool to interactively wire together a complex AI app in Node.js. The large collection of community-based packages now includes support for deep learning models, opening up new possibilities for all users. You learned how to build your own TensorFlow.js Node-RED node, how to use TensorFlow.js on IoT devices, and how to deploy Node-RED flows in containers on a cloud. Your Node.js AI application can now run at the edge to process large volumes of data or in an enterprise environment together with other microservices.
Look for the next tutorial, where we will go into techniques to monitor and optimize the performance of your JavaScript AI application.